High Altitude Balloon Launch
Summary and TLDR
My spouse works for a school division and was able to get a grant for launching a high altitude balloon. I’ve tried to compile some of the details.
We successfully launched and the flight was going great. We peaked at 21km altitude where the balloon burst, but lost track of it shortly after. We believe the battery pack failed due to the temperature, which was around -20c for around 40 minutes before it stopped sending updates. I strongly believe the parachute and payload stack was intact and it landed safely. We just don’t know where. We’re hopeful somebody finds it and gives us a call.
Bill of Materials
- 2 - Kaymont HAB-600 balloons.
- Near Space Parachute 1.0m.
- LightAPRS 2 Tracker. You, or someone else working on the project, need to have an amateur radio license to use this.
- Helium Tank. Obtained from a local welding supply company.
- Payload Container. A cardboard box.
- 5000mAh battery pack. Sourced from Amazon.
- GoPro Hero 9 Black.
- Micro SD Card for the camera.
- Kevlar kite string, 50lbs test.
- Radar Reflector (cardboard and aluminium tape).
- Zipties
- Filling hose
Balloon
We bought two just in case one failed prior to launch or during filling. I don’t know that we’ll buy a second if we launch again. We didn’t have enough helium to fill a second balloon anyways.
Parachute
You could probably get away with a cheaper one. Since this was the first time we tried this, we wanted to get a “name brand” one and not deal with shopping around.
Helium
The amount of helium you need will depend on the size of the balloon you purchase, and the gross weight of your payload (everything below the balloon). High Altitude Science has calculator on their website which will help. A welding supply company is probably your best bet for getting a larger cylinder. A dolly/handcart and straps will help you move it around. The cylinder also makes a handy anchor to hold the balloon down while filling!
Payload Container
We used a small paperboard/cardboard box from a beebot.
Battery
Nothing special, just a generic 5000mAh lithium battery pack from amazon.
GoPro Hero 9 Black
You can definitely use something cheaper. More later…
MicroSD Card
A name brand one with 100MB/s or more write speed should work fine. We bought 256GB, which was complete overkill.
Kevlar Kite String
We used 50lbs test string, which we believed was the strongest we could legally use in the US. I’ll talk about how much you should buy later…
Radar Reflector
Makes the Balloon visible to radar. Our’s was small enough to be FAA exempt, but we included it just to be safe. A quick google search will show you what to make.
Zipties
Like anything worth building, zipties hold a lot of it together! Get good ones!
Filling hose
We used a pressure washer hose with the threaded end in the balloon neck and the quick connect end on the cylinder nozzle. We didn’t tape it. Next time we’ll tape it!
Odds and ends
- Clippers
- Scissors
- A tarp large enough to put the uninflated balloon on
- Electrical Tape
- Duct tape (“duck tape”, not the foil tape actually for ducts)
- Foil tape (the foil tape actually for ducts)
Preflight Testing
Tracker
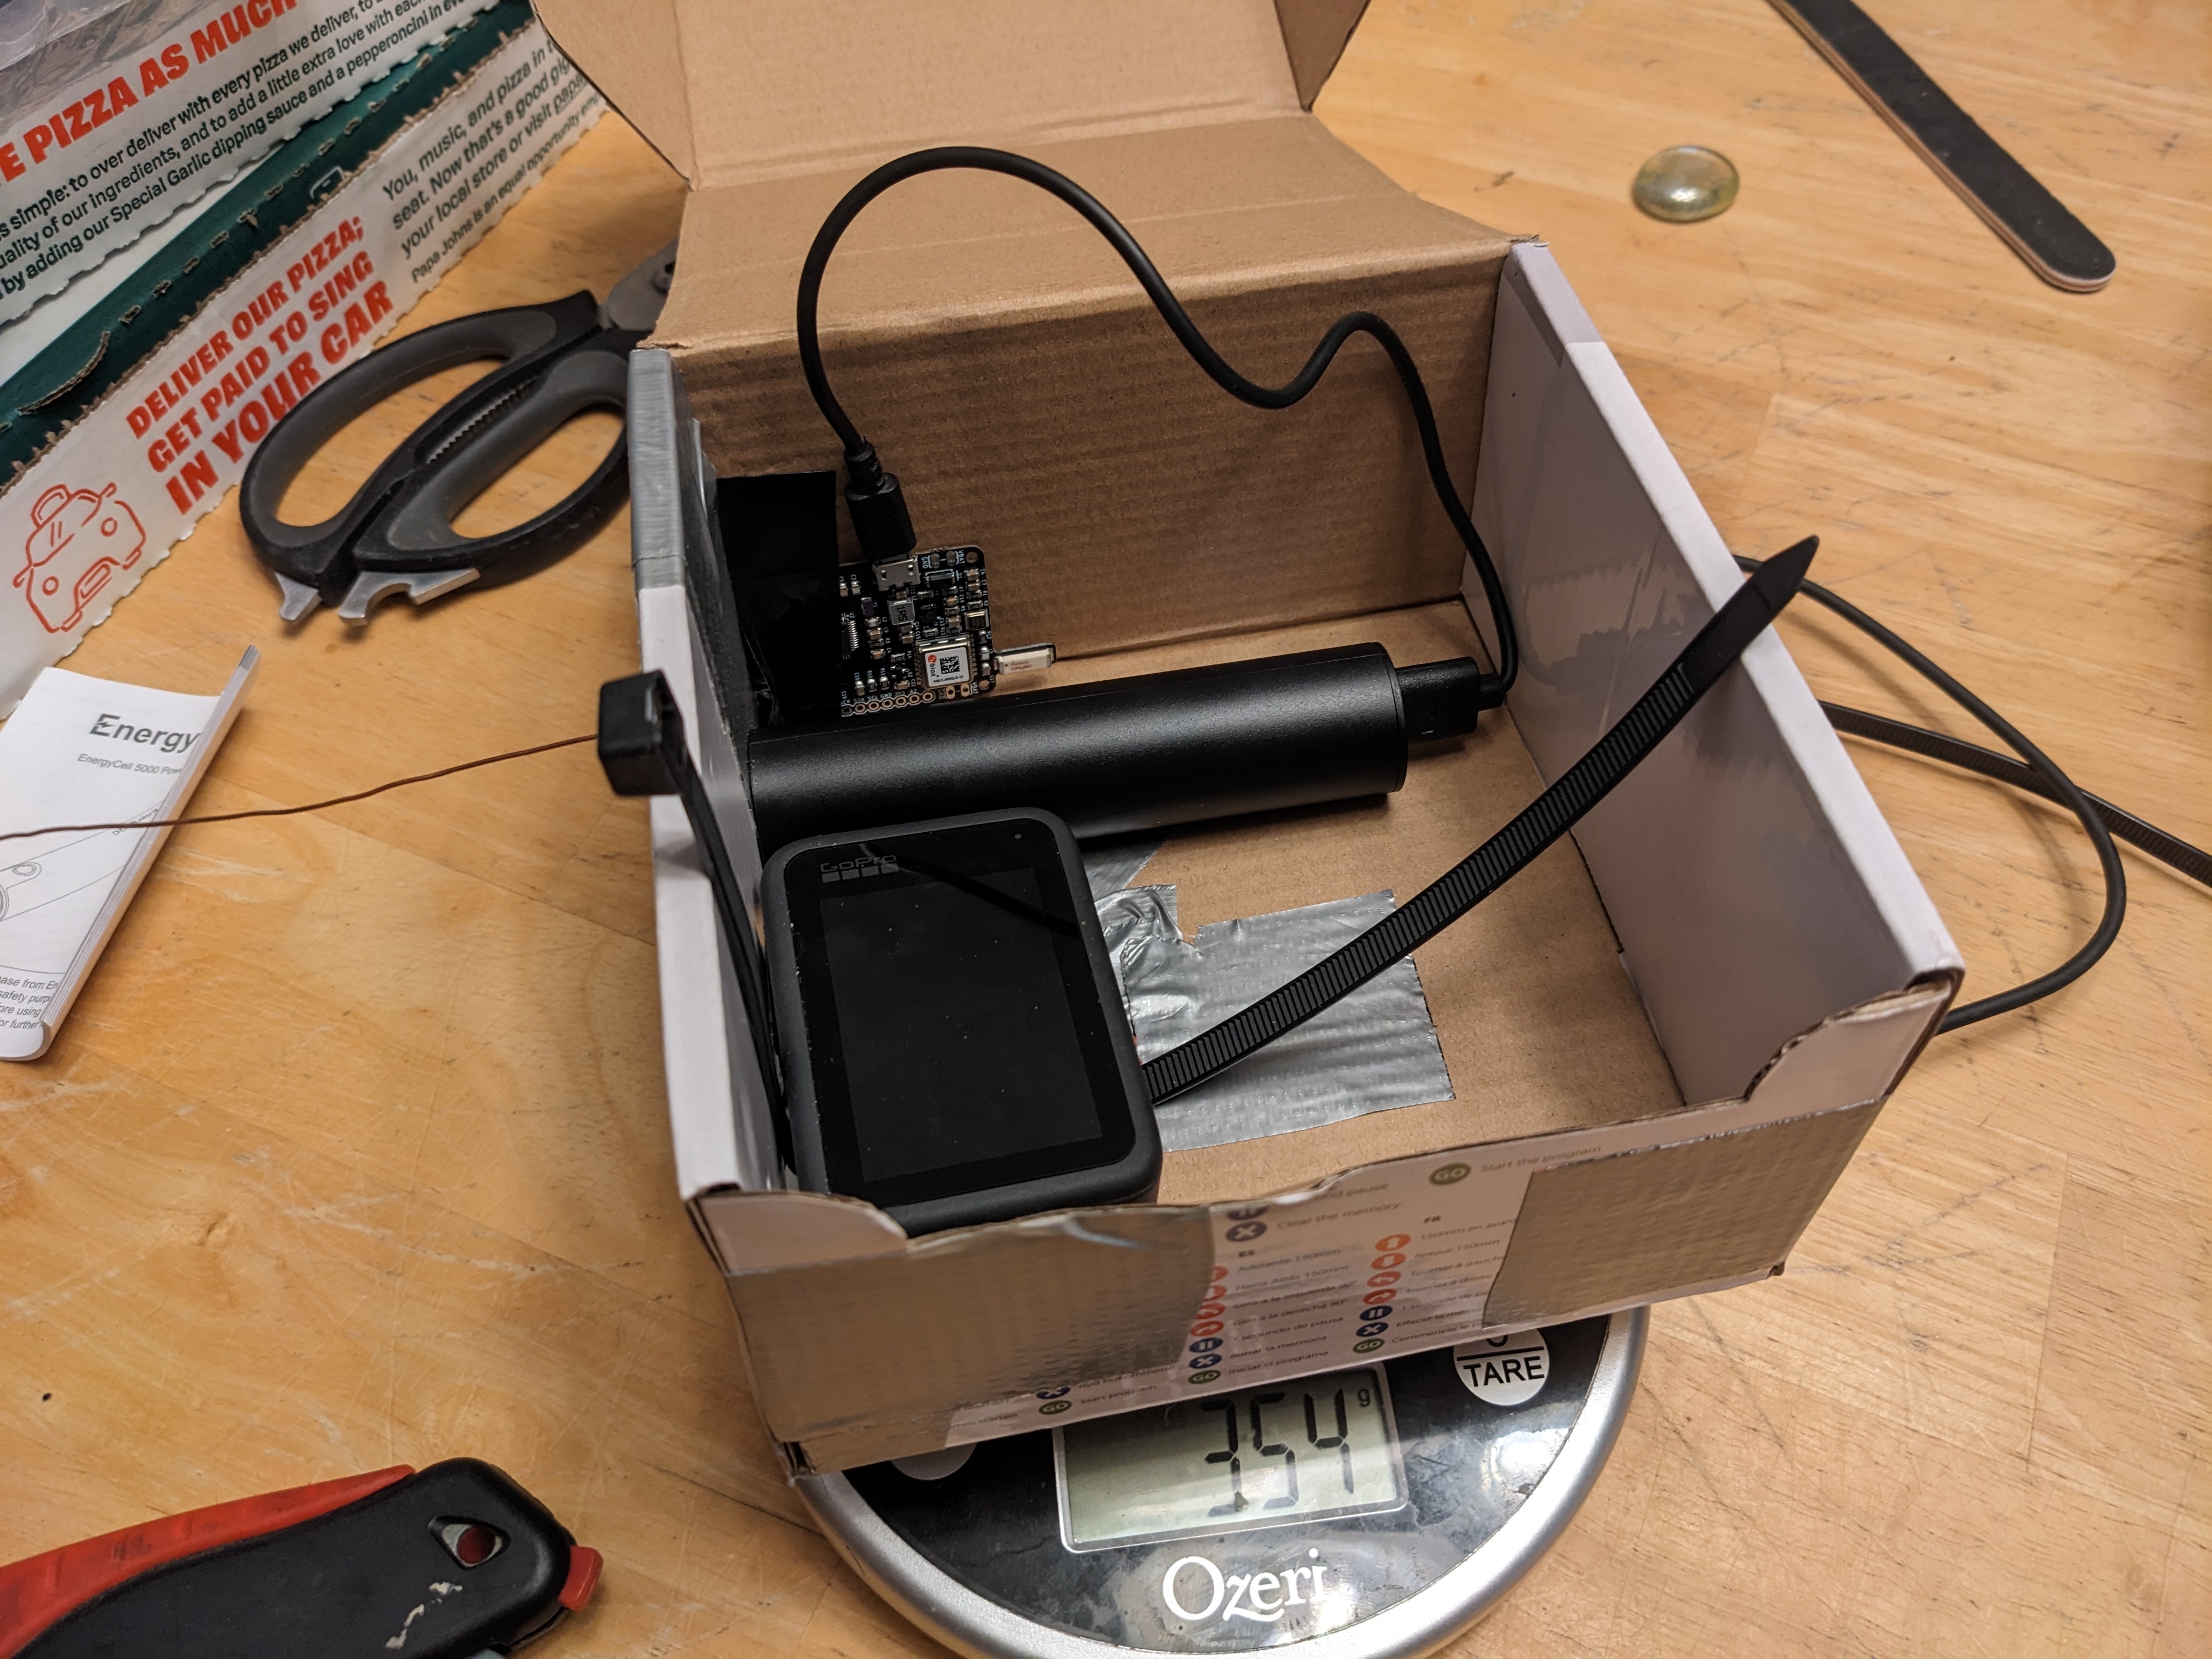
The tracker cost around $130 shipped from QRP Labs. It has GPS onboard with an antenna, a 2-meter amateur radio transmitter, temperature sensor, and air pressure sensor. Well worth the money in my opinion. You need to attach an antenna and program it and then it’s good to go. To program it you use the Arduino IDE. The software is open source and everything you need to get it working is on their Github page.
I used a 50cm (19.7") length solid copper ~20AWG piece of wire as the antenna, soldered directly to the board. I poked a hole in the bottom of the payload box and fed it through and used electrical tape to hold the tracker down inside.
During testing I found the tracker to work for almost 3 days when powered from the fully charged 5000mAh battery.
GoPro
During testing I found that the GoPro would overheat after a little more than an hour recording at 4k 30fps. It would still have around 25% battery left when it powered back on. Our planned flight time was around 3 hours. After changing to 1080p 30fps, it would last nearly two hours and fully drain the battery. We were pretty sure that this would at least capture the apex of the flight.
Launch
I didn’t get any photos as we put everything together and launched. We arrived at the launch site at around 8:15am with a planned launch time of 9:10am. We didn’t launch at 9:10am, but that is when a small army of middle schoolers grades came out to watch us panic to get everything ready to go! It became stressful to say the least! I’m proud to say I only dropped one f-bomb during the process and I don’t think any of them caught it!
Buttoning up the payload and tying everything together
I taped and ziptied everything down in the box, closed it and wrapped the ducktape around the openning flap and box twice to make sure it didn’t pop open during flight.
To create attachment points to tie the payload to the parachute and the radar relflector to the payload, I wrapped two zipties verically around the box. I wrapped duck tape horizontally around the box to further attach the zipties to the box and make sure they didn’t shift. Where the kite string would be tied to the zip ties, I wrapped electrical tape to keep the knots from chaffing.
The stack would be arranged: Balloon -> Parachute -> Payload -> Radar Reflector
For everything except the radar reflector, I used two lengths of string, tied independently of each other for redundancy.
To attach the stack to the balloon, I took two zipties parallel to each other. I cut two 3’ lengths of kite string and tied both, independently, to both zip ties. I put electrical tape over the knots on the zipties to prevent fraying and cover them up. I tied the lengths of string to the loop on top of the parachute.
I tied a small loop at the bottom of the parachute risers and tied two 5’ lengths of kite string to the loop. I attached the opposite ends of the string to both of the zip ties on top of the payload. Each length was arranged so the payload would stay level in flight: one string went under the left ziptie first, the other went under the right first.
The radar reflector was tied to the zipties underneath the payload.
Preparing the Balloon and starting to fill
The balloon isn’t as delicate as a normal mylar or party balloon, but it’s not indestructible. Throughout the process it’s important to be careful with sharps: clippers, scissors, etc. To protect the balloon all the zipties were taped over with electrical tape after being clipped to length.
To anchor the balloon we tied a piece of rope to a zip tie and attached to the neck of the balloon. We attached the rope to a fish scale and the fish scale to the helium tank. Our anchor rope was way too long, but we didn’t notice until we were deep into filling. This caused us to overfill the balloon because we couldn’t get an accurate positive lift measurement from the scale. I believe this is due to the filling hose pulling down on the balloon.
Once the balloon started to float we attached the two zipties from the payload stack just below the anchor ziptie.
It was at this point I noticed the fish scale reading not changing… for a while. At this point we adjusted the length of rope from the scale to the tank and started to get better readings. Wind gusts still made it difficult to get an accurate reading.
With the helium tank virtually empty and the thought that we had definitely overfilled the balloon, we pulled the hose out. To tie off the neck, I twisted the neck a couple of times, and folded it over on itself so the mouth faced upwards. We wrapped yet another ziptie around it, clipped it, and taped it up.
Using a Baofeng HT, audio interface cable, and APRSDroid on my phone, I checked one last time that the tracker was transmitting. I turned the GoPro on and started recording using the quik app.
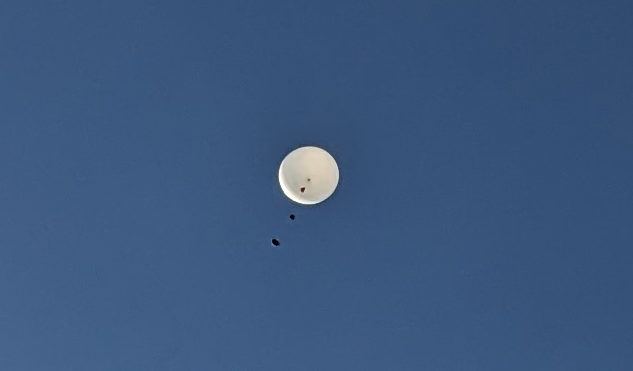
My spouse held the balloon while I made sure the payload stack didn’t become tangled. The middles schoolers counted down from 10 and my spouse let go at 9:55am. As soon as I felt pressure on the payload I let go and it floated up and over the school.
The Flight
The flight went great. Until it didn’t.
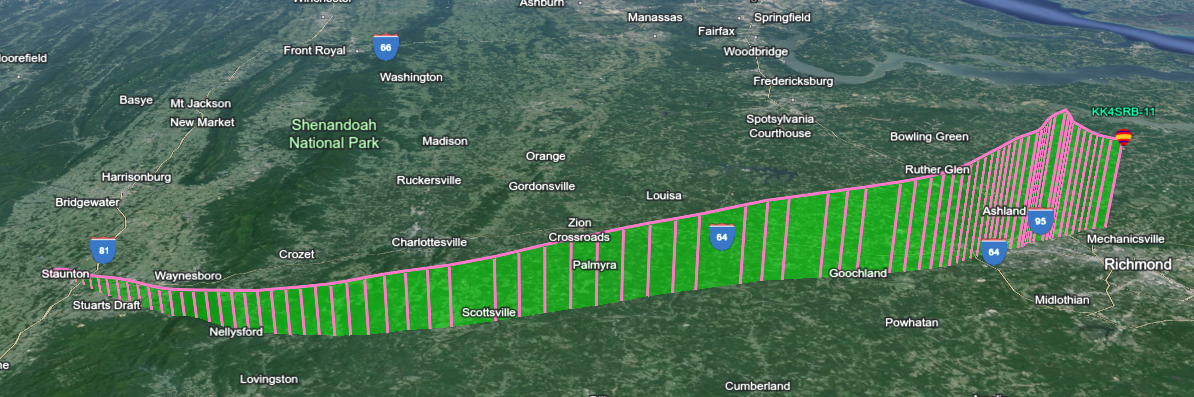
Intially we were climbing at 5.9m/s, letting us know we definitely overshot our filling target! The balloon reached a top land speed of 263kph (163mph). We reached a peak altitude of 21,279m (69,812’) over Richmond, VA. Unfortunately just 10 minutes later we received the last update from the tracker, slightly northeast of Richmond at 14,806m (48,576’) at 11:18am EDT. Its landspeed was 96kph (59mph) and was descending at around 7m/s. Its descent rate was faster than we expected it to be at landing, but the air pressure was also 5% what it was at ground level! I think the parachute was fully open and working as intended.
Starting at 10:32am EDT the internal temperature of the payload hit -17c (0f) and wouldn’t rise above that for the rest of the flight. During the final 4 minutes of data we received, the temperature dropped below -24.6c (-12.28f) with the lowest recorded temperature at -24.9c (-12.82f).
Conclusion
It’s difficult to say what exactly caused the tracker to stop working. I think the most obvious is the temperature. It became exceptionally cold inside the payload and batteries don’t like the cold! The most likely point of failure was probably the battery pack.
Another possibility is the tracker’s antenna becoming damaged. I only noticed and acknowledged that the reflector’s string could interfere with the antenna as we were launching. It was far too late to make any adustments. However I think the antenna was flexible enough that any interference from the line wouldn’t have damaged the antenna. This is a distance second in the running for root cause for me.
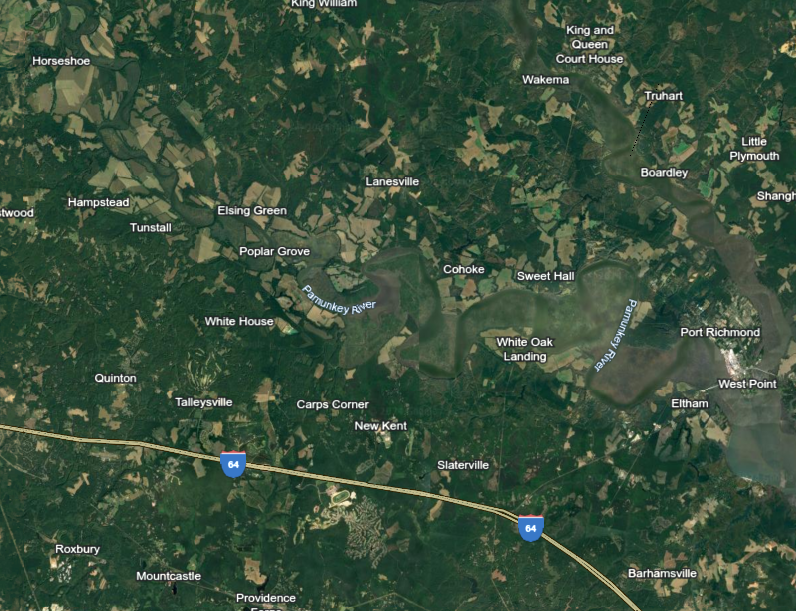
Figuring out where it landed is virtually impossible at this point. My best (wild) guess is somewhere north of i64 between Richmond and Westpoint. It’s possible it flew even further east depending on the wind, though. All we can do now is hope someone finds it and gives us a call!